
Retrieve and Display data from the Internet into your Android App with Retrofit.


In this tutorial, we'll build an app that connects to a web service to retrieve and display data. We'll be using the Retrofit library to connect to a REST web service on the internet and get a response. For now, we focus on displaying raw JSON. And of course, we'll be using Android Studio as our IDE.
Step 1: Create a new project and call it DisplayData
- Open Android Studio if it is not already opened.
- In the main Welcome to Android Studio dialog, click Start a new Android Studio project.
- The Choose your project dialog appears. Select Empty Activity as shown below, and click Next.
- In the Configure your project dialog, enter "DisplayData" for the Name and click Finish
Step 2: Add various dependencies:
- Inside the dependencies block, add the Gradle dependency for the Retrofit and ViewModel.
//Retrofit
implementation "com.squareup.retrofit2:retrofit:2.9.0"
implementation "com.squareup.retrofit2:converter-scalars:2.9.0"
//ViewModel
implementation "androidx.lifecycle:lifecycle-viewmodel-ktx:2.2.0"
- Add the data binding dependency to Gradle
android{...

    buildFeatures {
        dataBinding true
    }
- Apply the kotlin-kapt plugin at the top of the build.gradle file
id 'kotlin-kapt'
- Ensure the support for Java 8 language features are added
compileOptions {
    sourceCompatibility JavaVersion.VERSION_1_8
    targetCompatibility JavaVersion.VERSION_1_8
}
kotlinOptions {
    jvmTarget = '1.8'
}
Click on Sync Now
Step 3: Setup ViewModel and connect with MainActivity
- Create a new Kotlin class called DisplayDataViewModel class and make the class extend the abstract class ViewModel
class OverviewViewModel : ViewModel() {
}
- In DisplayDataViewModel, we create both internal and external LiveData for the response String
private val _response = MutableLiveData<String>()

val response: LiveData<String>
    get() = _response
- At the top of MainActivity class, make the MainActivity lazily initializes the DisplayDataViewModel.
private val viewModel: DisplayDataViewModel by lazy {
    ViewModelProvider(this).get(DisplayDataViewModel::class.java)
}
- Inside the onCreateView() method. Inflate the MainActivity layout using data binding. Comment out or delete the setContentView line of code.
//setContentView(R.layout.activity_main)
val binding: ActivityMainBinding =
    DataBindingUtil.setContentView(this, R.layout.activity_main)
- In the activity_main.xml layout, add the data binding for the view model. This imports DisplayDataViewModel. (Make layout view the root view).
<layout ...>
    <data>
        <variable
            name="displayDataViewModel"
            type="com.example.marsproperty.DisplayDataViewModel" />
    </data>
</layout>
- Create the Constraintlayout, and add the TextView inside. Bind the response from the ViewModel to the TextView
<androidx.constraintlayout.widget.ConstraintLayout
        android:layout_width="match_parent"
        android:layout_height="match_parent"
        tools:context=".MainActivity">
    <TextView
        android:layout_width="wrap_content"
        android:layout_height="wrap_content"
        android:text="@{displayDataViewModel.response}"
        app:layout_constraintBottom_toBottomOf="parent"
        app:layout_constraintLeft_toLeftOf="parent"
        app:layout_constraintRight_toRightOf="parent"
        app:layout_constraintTop_toTopOf="parent" />
</androidx.constraintlayout.widget.ConstraintLayout>
- Inside the MainActivity file, Specify the MainActivity view as the lifecycle owner of the binding and pass the displayDataViewModel into the data binding.
binding.lifecycleOwner = this
binding.displayDataViewModel = viewModel
Step 4: Implement the DisplayDataApiService
- Create DisplayDataApiService.kt and add a constant Base Url at the top of the file.
private const val BASE_URL = "https://jsonplaceholder.typicode.com/"
- Below the constant, use a Retrofit builder to create a Retrofit object
private val retrofit = Retrofit.Builder()
   .addConverterFactory(ScalarsConverterFactory.create())
   .baseUrl(BASE_URL)
   .build()
- Just below the call to the Retrofit builder, define an interface that defines how Retrofit talks to the web server using HTTP requests.
interface DisplayDataApiService {
    @GET("todos")
    fun getProperties():
            Call<String>
}
- Below the DisplayDataApiService interface, define a public object called DataApi to initialize the Retrofit service.
object DataApi {
    val retrofitService : DisplayDataApiService by lazy {
       retrofit.create(DisplayDataApiService::class.java) }
}
Step 5: Call the web service in DisplayDataViewModel.
- In the DisplayDataViewModel, we create the init block and call getDetails() method inside.
init {
    getDetails()
}
- Create the getDetails method
private fun getDetails() {

}
- Next we'll call the web service in DisplayDataViewModel. Inside the getDetails() method, add the code below,
DataApi.retrofitService.getProperties().enqueue(
   object: Callback<String> {
})
- Click on the word object, which is underlined in red. Select Code > Implement methods. Select both onResponse() and onFailure() from the list.
override fun onFailure(call: Call<String>, t: Throwable) {
       TODO("not implemented")
}

override fun onResponse(call: Call<String>,
   response: Response<String>) {
       TODO("not implemented")
}
- In onFailure(), delete the TODO and set the _response to a failure message, as shown below.
override fun onFailure(call: Call<String>, t: Throwable) {
   _response.value = "Failure: " + t.message
}
- In onResponse(), delete the TODO and set the _response to the response body.
override fun onResponse(call: Call<String>,
   response: Response<String>) {
      _response.value = response.body()
}
Step 6: Define the internet permission.
Open app/manifests/AndroidManifest.xml. Add this line just before the tag:
<uses-permission android:name="android.permission.INTERNET" />
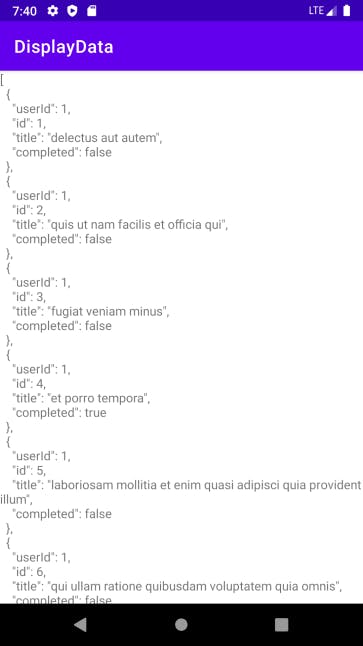
Compile and run the app. If everything is working correctly with your internet connection, you see...
 Cover photo by Luca Bravo on Unsplash